1.) First of all , you must have physical access to the console.
2.) Put your ESX host in Maintenance Mode and disconect it from Virtual Center.
3.) Now you can connect to the console of your ESX host.
4.) Remove the old IP adress (by deleting the vswif interface) “esxcfg-vswif -d vswif0″ (vsfif0 is your interface to remove. Otherwise use the number you need)

5.) Create a new vswif interface with the New IP adress “esxcfg-vswif -a vswif0 -p “Service Console” -i 192.168.0.100 -n 255.255.255.0 -b 192.168.0.255″ (vsfif0 is your interface you work with. Otherwise use the number you need). If you need, replace Service Console with the name of your Service Console portgroup (this one is the default value)
-i is the new IP adresse
-n is your new subnet
-b is your broadcast
6.) Update the default gateway. Open nano “nano /etc/sysconfig/network file”


Press “CTRL+O” and “ENTER” then “CTRL+Q” to quit
7.) Then you need to restart the interfac. Do a “esxcfg-vswif -s vswif0″ (this will disable the vswif0 interface) and “esxcfg-vswif -e vswif0″ (this will enable the vswif0 interface)

8.) You should now update update DNS and your HOSTS files. Also what I would do is a “ipconfig /flushdns” and “ipconfig /registerdns” on your Virtual Center server. Only after you should reconect your ESX server host in the Virtual Center.
You can change the DNS information, hostname from the VI client GUI:
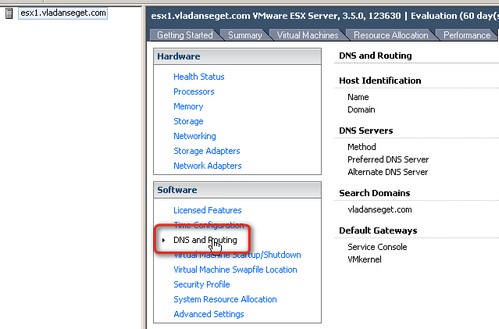
01.) Open the VI client and highlight the ESX Server host and click on the Configuration tab.02.) Click DNS and Routing.

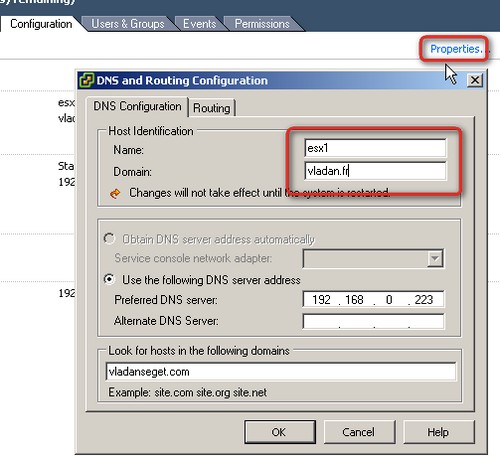
03.) Click Properties.
04.) If you want to change the hostname, domain, and DNS servers, click the DNS Configuration tab and enter the appropriate values.

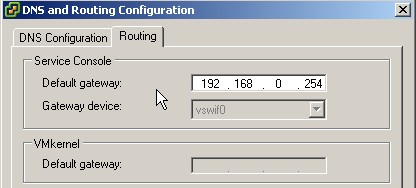
05.) To change the default gateway, click the Routing tab and enter the appropriate values.

06.) Then you can restart the ESX server from the GUI interface of your VI client for the changes to take an effect

So after the reboot you get this : (I just changed my DNS info from “vladanseget.com” to “vladan.fr” … as an example

No comments:
Post a Comment